 Copyright © Michael Richmond.
This work is licensed under a Creative Commons License.
Copyright © Michael Richmond.
This work is licensed under a Creative Commons License.
So, you want to help us to measure the distance to the asteroid Eros? Great! Let's look at the steps which are required. I'll try to provide a little guidance, but please don't think that this is the only way to do things.
The first step is to acquire an image of the asteroid sometime in late January or early February of 2012. During those months, the asteroid will be at its closest to the Earth, making it easiest to measure its distance. The asteroid will slide south through the constellation Sextans during this time, heading away from Leo and towards Hydra.

Thanks to Stellarium
for the nice charts!
Below is a table showing the position of Eros during this time. I made it using the excellent JPL's Horizon's ephemeris web site. If you'd like to learn more about using the Horizons system, you can read a short tutorial.

As the table shows, during this close approach, Eros will have an apparent magnitude of about 8.5. That's too faint to see with the naked eye, but it should be visible in binoculars and telescopes. There are several ways you might take a picture of the asteroid with a digital camera: you could use a telephoto lens and a tripod and simply point at the appropriate region of the sky, or you could attach the camera to a telescope.
Beware -- this will probably take some practice. I suspect that most DSLRs with ordinary camera lenses will require exposure times of at least 20 or 30 seconds in order to record the light of Eros. Your camera might run into problems with such long exposure times; you can practice indoors in a dark room. Special CCD cameras made specifically for astronomical imaging should work very well, of course.
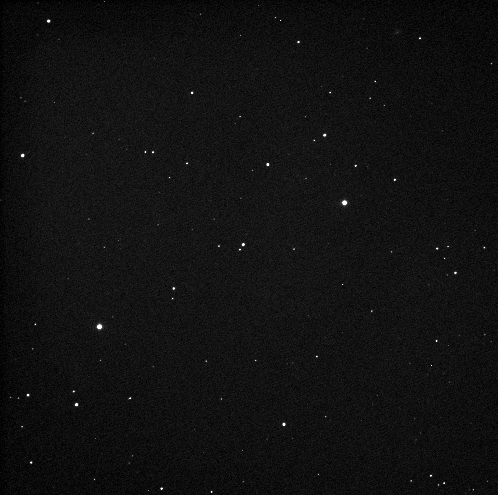
In order for you to determine the position of Eros in your image, you'll need to be able to see at least 10 or 20 stars. The more stars in your image, the better the chances that you'll be able to extract a good position for the asteroid. If you can't see many stars in the image, try increasing the exposure time, or using a lens which yields a larger field of view.
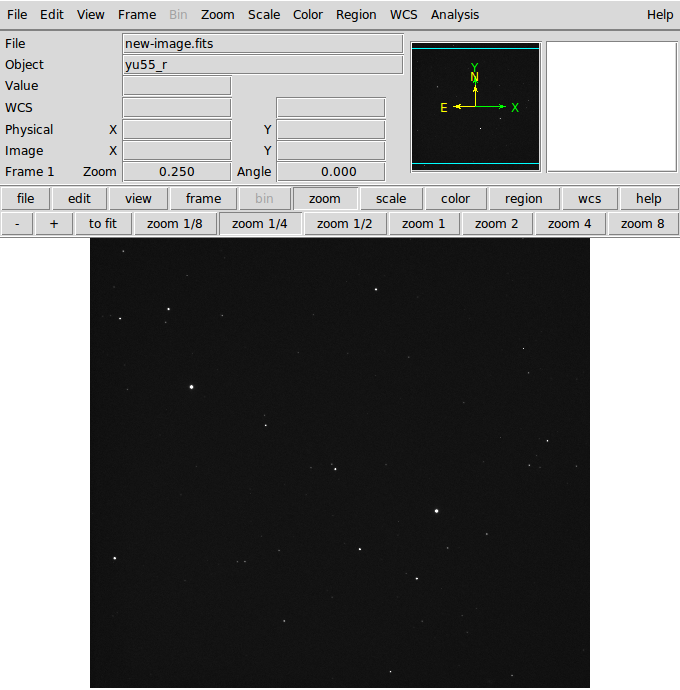
As an example, here's an image which does have enough stars to provide a good reference for matching. It's an image taken with an astronomical CCD camera attached to the 0.9-meter WIYN telescope at Kitt Peak, New Mexico. The exposure time was 90 seconds, and an R-band (red) filter was placed in front of the camera. This picture shows an asteroid -- not Eros, but one called 2005 YU55.
Be sure to record the time of your image carefully! Make sure to note the time when you begin the exposure to the nearest second. Try to synchronize your watch or clock to a time standard such as the WWV radio signals or the US Naval Observatory Master Clock. You'll need to use the mid-point of the exposure as the time for future analysis. So, for example, if you open the shutter at 11:23:47, and leave it open for 30 seconds, the mid-point of the exposure will be at
11:23:47 + (30 seconds / 2) = 11:23:47 + 00:00:15 = 11:24:02
Later, you can convert the time from your local time zone to Universal Time. There are plenty of websites which can help you to perform this conversion -- for example, EarthSky.org's explanation.
Okay, so you have an image of Eros and a bunch of nearby stars. The next step is to match up the stars in the image to stars in an astronomical catalog. We can use the (RA, Dec) positions of stars in the catalog to figure out the orientation and scale of your image; and then, in the final step, we can use that information to determine the RA and Dec of Eros itself. Let's focus on the matching process here.
Before we begin, make sure that your image is in one of the following formats:
JPEG, GIF, PNG, FITSOnly these formats are understood by the astrometric software that we will use.
Matching little dots of light in a photograph to a table of positions in a catalog is a process with a long history. Astronomers have devised quite a few methods over the centuries to help them in this pattern matching. In some ways, it is more of an art or a puzzle than a science.
We will use a very helpful website called astrometry.net to do most of the work. Behind this website are some fast computers, lots and lots of stellar catalogs, and some clever algorithms. If you wish, you can read a technical paper which describes how the site works.
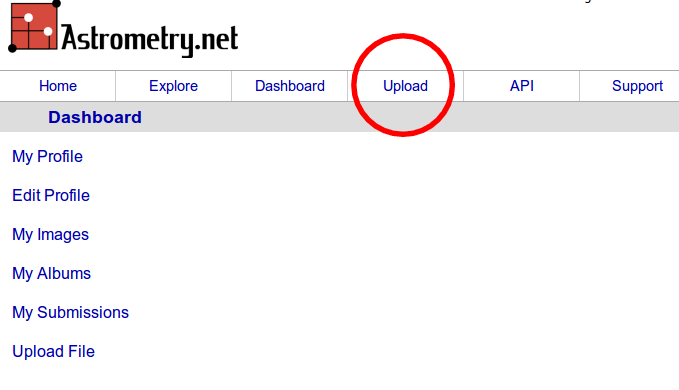
First, go to http://nova.astrometry.net/ and sign in. If you don't already have an account with one of the many supported providers, you may have to create an account with one first.
Next, choose the "Upload" item.
which will send you to this page:
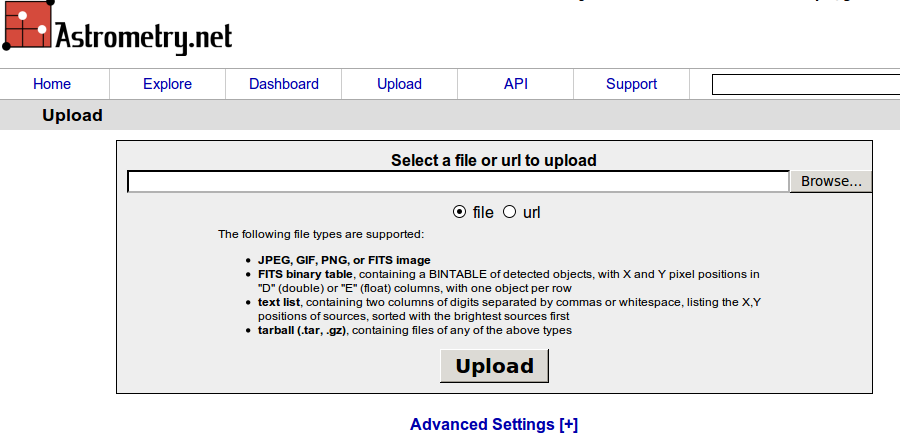
You can use the "Browse" button to choose the appropriate image on your computer into the empty box. Then, you have two choices.

Go back and "Upload" the image again, but this time, click on the "Advanced Settings [+]" item.
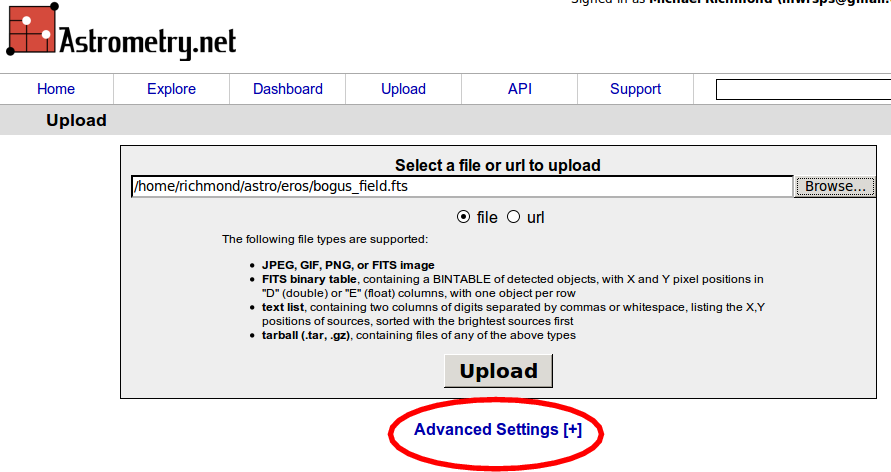
You should see a number of items which you can specify -- it's okay to leave most of them blank. The two which might help the software to measure your images are
            10 hours +  (30 minutes / 60 minutes) =  10.5 hours

            10.5 hours * 15 (degrees/hour) = 157.5 degrees
Despite your best efforts, if the astrometry.net software fails, you may be out of luck. Perhaps you need to take pictures which show more stars, or have a larger field of view.
At this point, you should have taken an image of the sky and used the astrometry.net site to match the stars in it to an astronomical catalog. There's just one more step before you will have the (RA, Dec) position of Eros.
First, you'll need to download the "astrometrically calibrated" version of your image from astrometry.net Go to the "Dashboard" item on the main web page, and click on "My images." You should see a page with thumbnails of the images you have submitted. Click on one which was successfully matched to bring up a page like this:

On the right-hand side, you should see a line labelled "New FITS image" (I've circled it in red). Click on the link -- "new-image.fits" in my example -- and save the file to your computer's disk.
What is it? It's a version of your image in a rather obscure format called "FITS", which is used exclusively by astronomers. If you really want to know more about this format, you can read NASA's HEASARC pages on FITS. The basic idea is to combine the data for an image (the pixels) with a set of information about the image. FITS files consist of a header, composed of ordinary ASCII characters, followed by a the pixel data. If you wish, you can open the image with an ordinary text editor. If you make the editing window EXACTLY 80 characters wide, you'll see something like this:
SIMPLE  =                    T / Fits standard
BITPIX  =                   16 / Bits per pixel
NAXIS   =                    2 / Number of axes
NAXIS1  =                 2000
NAXIS2  =                 2000
EXTEND  =                    F / File may contain extensions
BSCALE  = 1.000000e+00
BZERO   = 0.000000e+00
ORIGIN  = 'NOAO-IRAF FITS Image Kernel July 1999' / FITS file originator
For our purposes, the important portion of the header is the part which contains the information added by astrometry.net; the first few lines of this section should look sort of like this:
COMMENT --Start of Astrometry.net WCS solution--
COMMENT
CTYPE1  = 'RA---TAN-SIP' / TAN (gnomic) projection + SIP distortions
CTYPE2  = 'DEC--TAN-SIP' / TAN (gnomic) projection + SIP distortions
WCSAXES =                    2 / no comment
EQUINOX =               2000.0 / Equatorial coordinates definition (yr)
LONPOLE =                180.0 / no comment
LATPOLE =                  0.0 / no comment
CRVAL1  =        36.6191898397 / RA  of reference point
CRVAL2  =        16.8128921849 / DEC of reference point
CRPIX1  =        1013.09495192 / X reference pixel
CRPIX2  =        1071.39555876 / Y reference pixel
CUNIT1  = 'deg     ' / X pixel scale units
CUNIT2  = 'deg     ' / Y pixel scale units
This section (which goes on for many more lines) contains information which can be used to convert the (x, y) position of any pixel in the image into the corresponding (RA, Dec) position on the sky. If you had a calculator, some instructions, and a little time, you could do it all yourself.
Fortunately, there's a better way: let the astronomical image display program ds9 to do all the hard work. Just download the program onto your computer: it's free, and versions exist for Linux, MacOS, and Windows. Once it's installed, run the program.
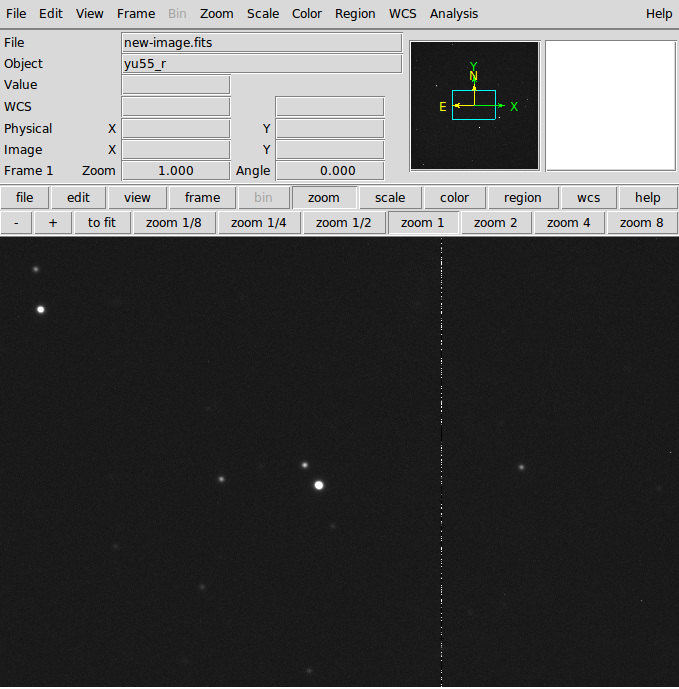
Use the "File" menu item at upper left to open the FITS image. You can use the "Zoom" menu item to adjust the display so that all or only a portion of the image is shown, and the "Scale" menu item to change the contrast. If you hold down the right mouse button and move the cursor, you can also modify the display. Here's my image in ds9 after I played with the zoom and scale:
Note the small window at top right. The yellow arrows and letters indicate the direction of "North" and "East" on your image. Most astronomical charts show North up and East to the left (unlike maps on Earth, which show North up and East to the right).
Now, here's the best part: because astrometry.net added its section to the FITS header of this image, ds9 will automatically compute the (RA, Dec) position of the cursor as you move it through the image! All you have to do is move the cursor so that it sits on top of Eros in your image, and then you can read its position from the "FK5" boxes in the ds9 widnow.
Let me illustrate. In my image, the asteroid is the brightest object close to the center of the image. So, first, I'll zoom in:
Then, as I move my cursor over the asteroid, I can use the small window at top right -- which shows an enlarged version of the image near the cursor -- to make sure I center the cursor on the asteroid.
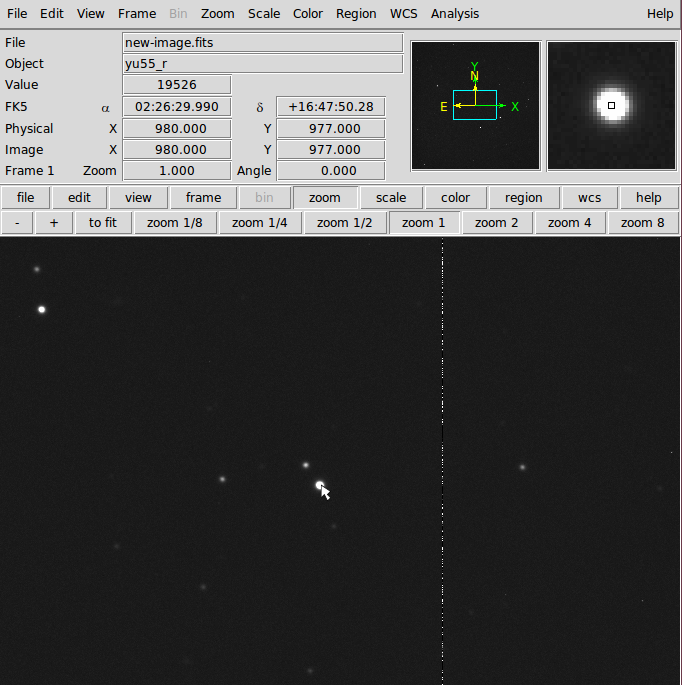
Now, up near the top of the ds9 window, note the word "FK5". Next to it are two boxes. The first contains the Right Ascension of the pixel at the location of the cursor, and the second contains the Declination. In my image, the asteroid 2005 YU55 is located at
RA = 02:26:29.99 Dec = +16:47:50.28Once you have these values for asteroid Eros in your image, you are ready to make your report to the Transit of Venus site. Make sure you include this information:
Copyright © Michael Richmond.
This work is licensed under a Creative Commons License.