
Recently, I was loaned a system capable of performing high-speed photometry -- with accurate timestamps -- of occultation events. The system consists of
Setting up the system is a bit complicated; there are many small pieces that must be connected, and software to control them all properly. I used this night to try the system on our 12-inch telescope, in order to get some idea for the field of view and rough limiting magnitude under a range of exposure times. This was the second night I've tried to test the camera on our 12-inch telescope, and things went more successfully. However, there were still some issues that will require me to run more tests and work on my procedures -- see the two "problems" listed below.
I discovered one thing the hard way: the position of the (optional) focal reducer in front of the camera can make a big difference. The first time I tried taking images, on Aug 24, 2022, I used a "long" adapter on the camera to allow it to fit into a standard 1.25-inch slide tube. I attached the focal reducer to the end of the adapter, placing it about 50 mm from the front edge of the camera housing. The result was a large field of view (good), but a LOT of distortion (bad). Stellar images even a small distance off-center were quite comatic.
This time, I tried using a "short" adapter. Together with a small spacing ring with ridged edges, it caused the focal reducer to be much closer to the camera body: about 31 mm.
With this setup, camera yields images with a wide field of view and only a small amount of distortion. Compare this picture of M57 with focal reducer (North up, East to the left)
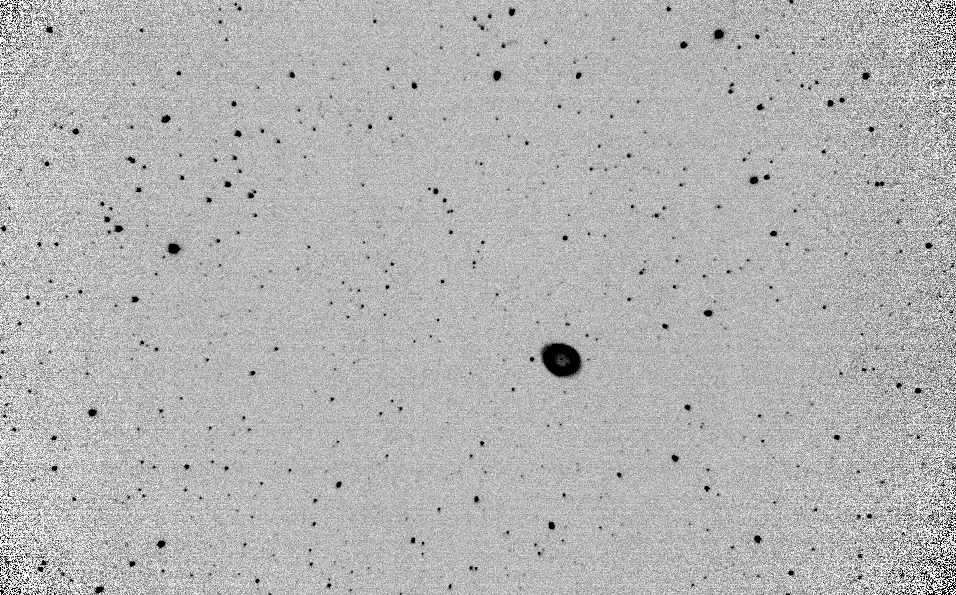
to this image without the focal reducer:

I measured the pixel (row, col) positions of stars in each image, then performed an astrometric match to stars from the Gaia EDR3 catalog. The results provide a quantitative measure of the increase in field of view.
  Mounted on Meade 12-inch f/10 LX200 telescope

                     without focal reducer           with 0.5x focal reducer
------------------------------------------------------------------------------
Binning                    2 x 2                            2 x 2

Num matched stars           14                                54

plate scale          0.806 arcsec/pix                     2.025 arcsec/pix

field of view           12.9 x 8.1 arcmin               31 x 20 arcmin

------------------------------------------------------------------------------
The FWHM was roughly 3.5 pixels when binned 1x1, and about 1.5-2.0 pixels when binned 2x2. Given the big savings in disk space, and (see below) the promise of faster image cadence, I think I'll be operating in 2x2 binning most of the time.
For these test images of M57, I took sets of 10 or 20 consecutive pictures. Immediately before or after each set of target frames, I took dark frames of matching exposure times. In order to flatfield the data, I acquired images of a white posterboard mounted on the interior of the dome, illuminated by incandescent lights. I created master darks and flats using a pixel-by-pixel median technique, and used the darks and flats to clean the images in the usual manner. I used the "stars" routine from XVista to find stars in each image and performed aperture photometry using a radius of 5 pixels (which was a good size for the 1x1 images, but probably a bit large for the binned 2x2 images). Finally, I performed inhomogeneous ensemble photometry of each set of images to investigate the precision of aperture photometry with the system.
The results shown below are based on unfiltered images of stars in the field of M57; the exposure time was either about 5 seconds, or about 0.8 seconds; see my discussion of uncertainty in the actual exposure time.
First, with no focal reducer in place:
![]()
Next, with the focal reducer in place. There are many more stars to examine, but the varying PSF from center to edge causes the scatter in instrumental magnitudes to increase.
![]()
Here are some notes for future reference:
              binning      exptime         interval between         fps
           ---------------------------------------------------------------
                1x1          25 ms              54 ms               18.5

                2x2          25 ms              25 ms               41
           ---------------------------------------------------------------
One of the items that gave me a bit of trouble was focusing the camera. Our telescope is equipped with an electric focuser which has an encoder; thus, one can choose to move the camera by any desired size of step inwards or outwards, and one can go back repeatably to any particular position. All well and good.
Under ordinary circumstances, using a normal camera and MaximDL, it is relatively quick and easy to focus the system via a series of short exposures of a small sub-frame. One can zoom in on the sub-frame, magnifying it many times so that the eye can see clearly any small deviations from the most compact and symmetrical PSF. MaximDL also provides a numerical estimate of the FWHM of a star, which can assist in the focusing procedure.
However, it was not so easy to focus this high-speed camera. The capture software did allow one to display each image as it was acquired, so that the visual response to changing the focus position suffered no delay. The problem was that the image of a single star was very small; even after zooming in as much as possible, to about twice or three times the natural size, a well-focused star was still just a tiny dot of 5 to 8 pixels across on my laptop's screen. Moreover, there was no quantitative measurement of the peak pixel value, nor any measure of the star's width or size. I did the best I could, but I'm sure I failed to find the best focus (as the image of M57 without focal reducer, in an earlier section, shows clearly).
The software does include an option for "focus assist", but I didn't realize until the end of the night that this option caused a small line to appear in the upper region of the image display. It's possible that the small line does provide some indication of the quality of the PSF, but I just wasn't paying close attention. I will look into this during my next run with the system.
It would be possible to find a good focus in a rather ponderous manner, by taking a series of single images at different focus positions, and then running a short script to measure the properties of stars in each image (or display zoomed-in versions of the stars); but that approach would take a few extra minutes. Not a big deal, but it would be nice to find a quicker way to focus the telescope.
During the night, as I operated the camera, I used the GUI controls to move a slider in order to set the exposure time. The slider's exact position was indicated numerically in a small box to the right of the slider. I wrote down this numerical value -- in units of milliseconds -- for each set of images, Simple.
But when I examined the images the next day, I discovered that the actual exposure time may have been different from the one I had written down. For example, for the sequence of images with index numbers 210-219, I set the slider so that the exposure time was 5155 milliseconds = 5.155 seconds. In the FITS header for these images, however, we see the following:
EXPTIME = 860.032704
That seems peculiar.
I had the memory that it was a slow process to acquire this set of images; in other words, as I watched the laptop's screen, I saw a progress bar advance very slowly, in steps separated by what felt to be several seconds. To check my memory, I examined the FITS headers of these images to look at the DATE-OBS value.
DATE-OBS= '2022-09-02T01:14:50.4778'
DATE-OBS= '2022-09-02T01:14:50.5960'
DATE-OBS= '2022-09-02T01:15:00.7805'
DATE-OBS= '2022-09-02T01:15:00.8986'
DATE-OBS= '2022-09-02T01:15:11.0831'
DATE-OBS= '2022-09-02T01:15:11.2013'
DATE-OBS= '2022-09-02T01:15:21.3858'
DATE-OBS= '2022-09-02T01:15:21.5040'
DATE-OBS= '2022-09-02T01:15:31.6885'
DATE-OBS= '2022-09-02T01:15:31.8066'
These values come in pairs. The members of each pair are separated by only about 0.12 seconds, but larger gaps of about 10 seconds separate the pairs from their neighbors. Hmmm. The overall duration of the sequence of 10 images does take roughly the expected amount of time (about 51 seconds, extrapolating ten seconds to be added for the duration of the final pair), but this seems like a very peculiar way to record the information.
My suspicion that the intervals between images was really the expected 5.1 seconds is boosted by the values of the DATE keyword in each FITS header:
DATE = '2022-09-02T01:14:50' / file creation date (YYYY-MM-DDThh:mm:ss UT)
DATE = '2022-09-02T01:14:55' / file creation date (YYYY-MM-DDThh:mm:ss UT)
DATE = '2022-09-02T01:15:00' / file creation date (YYYY-MM-DDThh:mm:ss UT)
DATE = '2022-09-02T01:15:05' / file creation date (YYYY-MM-DDThh:mm:ss UT)
DATE = '2022-09-02T01:15:11' / file creation date (YYYY-MM-DDThh:mm:ss UT)
DATE = '2022-09-02T01:15:16' / file creation date (YYYY-MM-DDThh:mm:ss UT)
DATE = '2022-09-02T01:15:21' / file creation date (YYYY-MM-DDThh:mm:ss UT)
DATE = '2022-09-02T01:15:26' / file creation date (YYYY-MM-DDThh:mm:ss UT)
DATE = '2022-09-02T01:15:31' / file creation date (YYYY-MM-DDThh:mm:ss UT)
DATE = '2022-09-02T01:15:36' / file creation date (YYYY-MM-DDThh:mm:ss UT)
Each file was created five or six seconds after the previous one.
Now, even if the files were created at five-second intervals, the true duration of each exposure could be any value up to five seconds -- such as the 0.8 seconds indicated by the EXPTIME keyword. I just don't know which value reflects the actual time over which photons were recorded.
Perhaps I need to examine more carefully the documentation for the software. One easy test for next time is to take a series of images of some star field, setting the exposure times to increase like so: 100 ms, 200 ms, 400 ms, 800 ms, etc. I can check to see how the values of EXPTIME in the header reflect these desired values: will they at least double each time? I can also measure the apparent brightness of stars in the images and check to see that the peak values of stars are increasing as expected (doubling in brightness each time).
I can also TRY to compare the counts recorded in an image with those predicted by some CCD signal-to-noise calculators, as one check on the actual exposure times. However, I'd very much prefer to have an accurate record of the real exposure time, so that I can use such calculators to estimate the overall QE of the system.