On the night of Mar 30/31, 2016, I attached our new CCD camera to the 12-inch telescope first the first time and took pictures of the sky. It was very cloudy, so I was only able to acquire crummy sky flats and a few poorly-focused images of Jupiter, but it's a start.
The main setup was:
The new camera is the Atik 11000, built around the Kodak KAI 11002 CCD.
There's good news and bad news.
It will take me time to figure out the best way to take advantage of this new device, and how properly to reduce the raw frames.
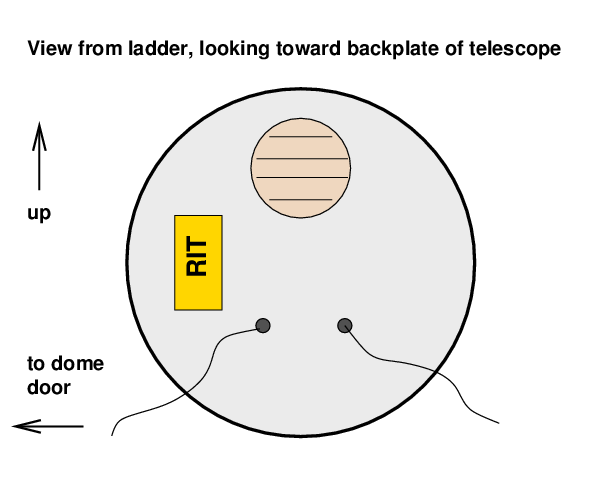
I mounted the camera on the back of the telescope as shown in the diagram below. As will be shown below, this orientation does cause the rows and columns to align with North/South/East/West, though the exact directions may have to be flipped.
One thing I did to all raw images before anything else was to divide all pixel values by 2. This decreased the range of values from 0 - 65535 to 0 - 32767, which allows me to use my XVista image processing software more easily. Yes, it's throwing away the lowest-order bit. Oh, well.
The camera has a nice TE cooler, which can reach about 30 or 35 C below ambient air temperature. On this night, I was able to set it to -20 C easily. I then took three sets of darks, placing the lens cap over the aperture of the telescope.
I combined 10 images of each type to create master darks. Below are histograms of the pixel values -- remember, all the pixel values have been divided by 2.
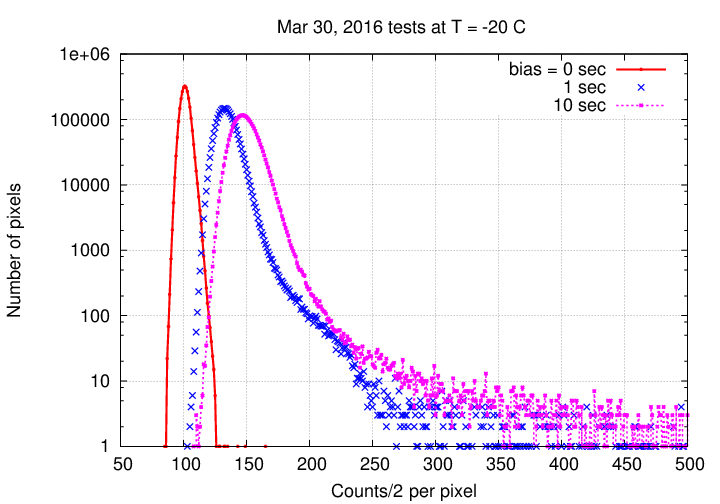
Note that the typical pixel value increases from about 101 to 132 when we increase the exposure time from zero to one second; that's an increase of about 31 counts in 1 second. But the 10-second dark exposure has a typical value of 147 counts, meaning that the value increases by only about 15 counts over the next 9 seconds.
This isn't the first time I've seen this behavior. Tests of the camera on a tabletop a few weeks ago showed the same phenomenon. I believe that this behavior has been measured in other Kodak KAI 11002 chips; see this paper by Popowicz:
I plan to take dark frames with exactly the same exposure times as all target exposures, during ordinary science operations.
Although the skies were cloudy, and the light both changing in time and space, I did take a set of 10 flatfield frames with no filter in place. The median master flatfield image looks like this:
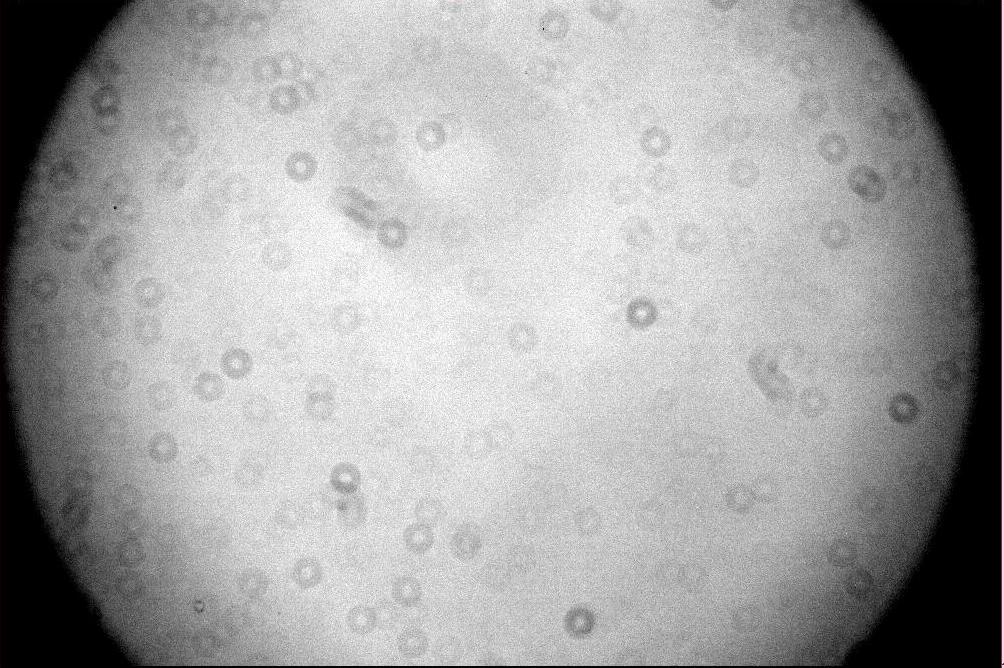
Looks like a microscope slide with some nasty bacteria, doesn't it?
Those "bacteria" are just the dust donuts due to little particles of dust on the camera's window, I believe. There are 2 or 3 little dark circles due to dust which may lie on the silicon itself. No big deal.
What IS a big deal is the vignetting. The apparent brightness drops off sharply near the edges and corners. This is in part due to the electric focuser which lies between the 12-inch Meade's backplate and the camera; the focuser has a constriction in the light-tube which is a bit less than 2 inches in diameter. Removing the focuser would provide more unvignetted area, but I'm not sure if I'll make that trade.
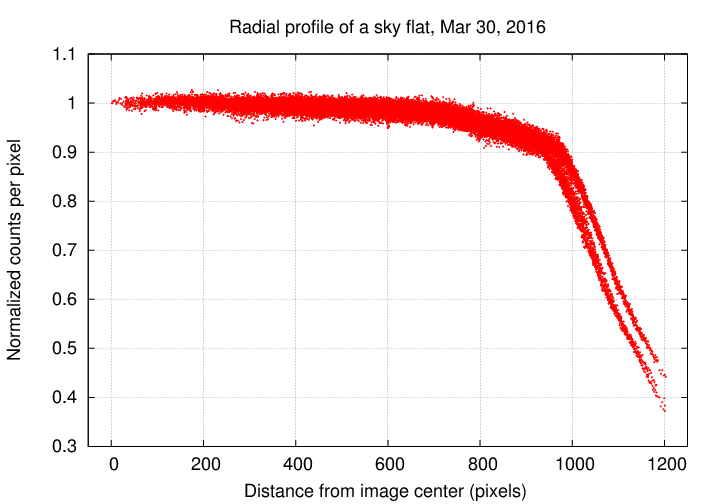
Here's a quantitative view of the decrease in intensity as a function of radius from the image center.
Since the sky was so cloudy, the only object I could glimpse, every now and then, was Jupiter, in the eastern sky. Over a period of half an hour, I managed to see enough of it to bring the telescope to a decent focus and take a few pictures.
Let's begin with a "long" exposure of 1 second, which clearly shows several stars in the field. We can use this image to check the orientation and plate scale.
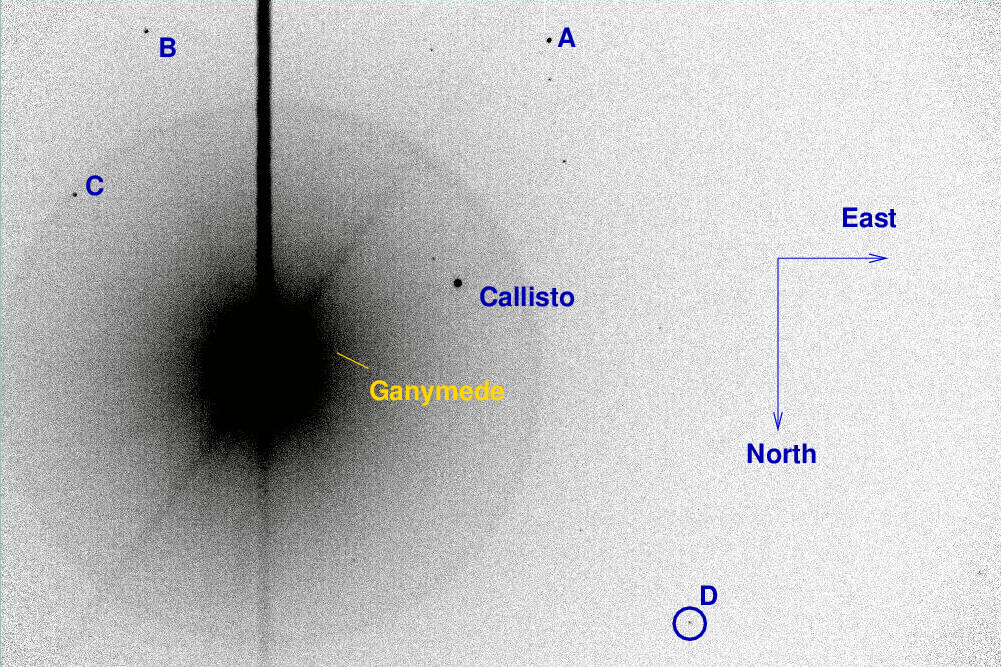
The stars marked in this exposure are
label      name               V mag
---------------------------------------
A       TYC 268-123-1           9.9

B       UCAC4 485-052293       11.2

C       TYC 268-327-1          11.5

D       UCAC4 487-051977       12.3
---------------------------------------
The stars allow one to figure out the orientation of the image, which I've marked in the figure above. I think that the orientation shown above is the same as the orientation provided by MaximDL when it displays images; if so, it will be a good idea to set MaximDL to flip the images both horizontally and vertically as it receives them from the camera.
Using the four stars marked in the image above, I performed a quick-and-dirty calculation of the plate scale (I used Aladin's "distance" tool to measure the angular distances between the stars, rather than going through the spherical trig properly). The result was
    plate scale  =   1.319  arcsec/pixel       (binned 2x2)

                 =   0.660  arcsec/pixel       (unbinned)
Using this plate scale, and the number of pixels in each direction, the field of view of the camera is
44 x 29 arcminutes
The unvignetted region is roughly 21 arcminutes in radius.
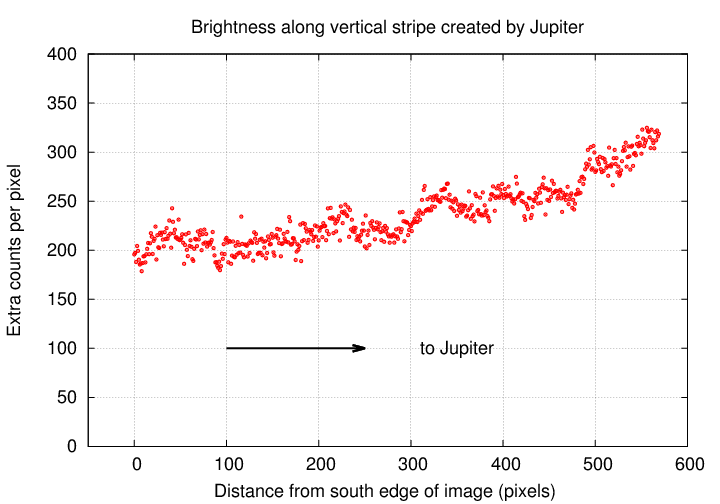
As you can see from the very-saturated image of Jupiter above, there is a vertical region stretching from Jupiter to the South edge of the image in which pixels have high values. This is more than an ordinary "bleed trail" -- I believe that is the consequence of the shutter-less operation. After an exposure "finishes", and the electrons are being transferred across the chip, light from a bright source (Jupiter) continues to fall on the silicon, knocking more electrons free.
I measured the brightness of pixels in this stripe, and compared it to the brightness of pixels near the stripe. The extra counts in the stripe increase as one approaches the planet, in a vaguely linear fashion. That provides some weak evidence for my hypothesis.
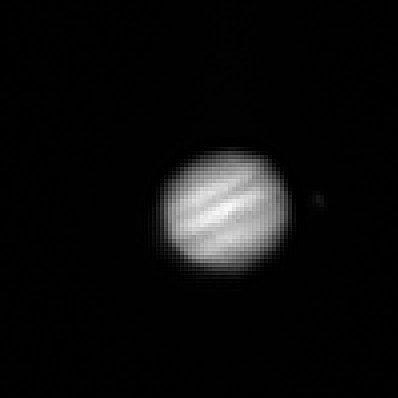
I took much shorter exposures, 0.01 seconds, in hopes of detecting some of Jupiter's cloud features. The best in my set isn't very good; I'll blame the lack of time to focus, and the general cloudiness. Nonetheless, one can see some faint hint of the bands by choosing the proper contrast setting.
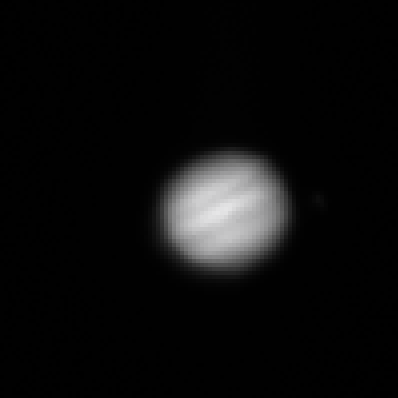
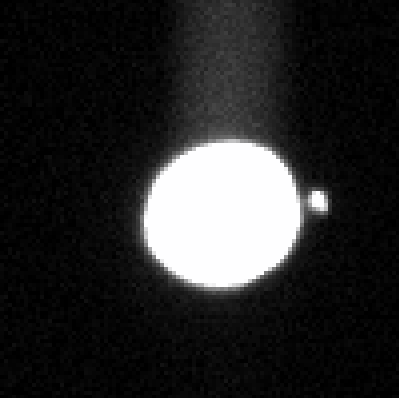
On the right, I've modified the contrast to emphasize fainter objects -- such as the moon which is just peeking out from the limb.
Just for fun, I applied an unsharp mask to the image of Jupiter. It's still a terrible picture, but maybe less terrible...
Last modified 3/31/2016 by MWR.