On the night of Mar 04/05, 2026, under somewhat cloudy conditions, I tested our equipment's ability to capture high-cadence images of bright objects. One of the groups of students taking the Observational Astronomy course this semester wants to experiment with some planetary and lunar imaging, and I had not used our current camera for that purpose yet. So tonight would be a chance to practice.
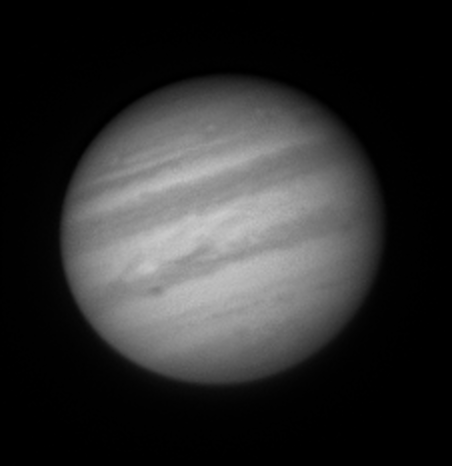
Here's the final product: a nice picture of Jupiter through the R-band filter, taken at about 8:19 PM = UT 2026 Mar 05 01:19. North is up, East to left. At this time, Jupiter's disk was about 41 minutes across.
These observations involved:
Notes from the night:
I managed to figure out some features of the ASICap software this evening; for example, I found the control for the camera's cooling system, and was able to set the temperature to -14 C. It's easy to switch filters, too. I also figured out how to flip the image, but not how to rotate it, alas. The image appears on the computer screen in real time with orientation North left, East down, which is rather annoying (I just rotated the sample image above after processing it).
One remaining mystery is why ASICap states that the connection to the camera is USB 2, rather than USB 3. The camera has a USB 3 port, and the computer (Dell PRo 24 All-in-One POlus QB 24250) has a number of USB 3 ports, but not USB 2 ports. Why would the connection be described as USB 2? Could it be the cable -- or maybe the length of the cable? The transfer speed is painful for a full frame, but quite acceptable for small sub-frames, as I used last night. For example, this setup
produced a rate of 28 frames per second. I accumulated the 1000 frames used to produce the image above is just over 30 seconds.
I took no dark frames or flatfields. In the future, it will probably work best to acquire target frames FIRST, so that one can set the appropriate sub-frame size and location, the gain, and the exposure time. Afterwards, one can keep these parameters while taking darks and flats.
The ASICap software saves its images in a format called ".SER". I have figured out how to convert 16-bit .SER collections into individual 16-bit integer FITS images, using routines from XVista, which may be useful at some point. However, for planetary work, a much better option is to use one of the many packages designed for image stacking. I tried the Planetary System Stacker program, since it runs on Windows, Linux and MacOS, and was able to get a nice picture in just a few minutes. Excellent!