 Copyright © Michael Richmond.
This work is licensed under a Creative Commons License.
Copyright © Michael Richmond.
This work is licensed under a Creative Commons License.
Aperture photometry is the measurement of light which falls inside a particular aperture; usually, we mean a circular aperture of some fixed size. The XVista tv command allows you to perform simple aperture photometry by pointing the cursor to a star and pressing the "a" key.
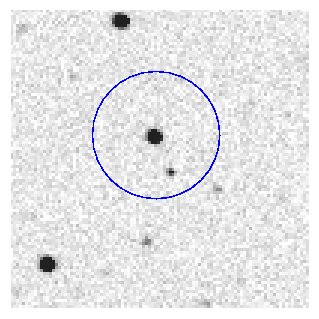
Before you can start measuring magnitudes, you need to pick a good size for the aperture. If you pick an aperture which is too big, you'll include light from neighboring stars:
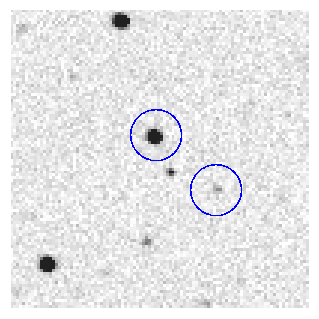
The apertures below don't include light from neighboring stars ... but they are still large enough that MOST of the area included around a faint star is clearly background sky. The light from the star itself is concentrated at the very center.
The goal is to pick an aperture which will include
A good compromise is an aperture which is a little bigger than the visible extent of faint stars:

In practice, a good choice for the radius of an aperture is about 1.5 or 2.0 times the FWHM.
Exercises:
- measure the FWHM of your images, in pixels
- calculate a good aperture size
- compare your aperture size to that of students using other sets of images. Are they all the same, or are there variations in the FWHM from set to set?
First, you need to set the size of the aperture. It is stored in the XVista symbol table, a little ASCII text file in the home directory of the CCD user. You can show the contents of the table by typing the XVista command xlet:
xlet

The aperture radius is controlled by the aperture_radius symbol; set it to the desired aperture radius in pixels:
xlet aperture_radius=3.9
You also need to set the radii of the annulus used to measure local background sky values for each star.
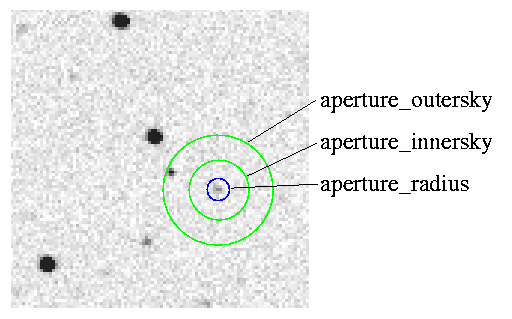
Reasonable values for the sky annuli are around 4-5 times the aperture radius for inner boundary, and around 6-7 times the aperture radius for outer boundary. It's okay if the annulus contains one or two stars, as long as the great majority of its pixels are purely background sky.
So, for example, one might type
     xlet aperture_innersky=15
     xlet aperture_outersky=25
Now, once you've set the apertures, you are ready to measure instrumental magnitudes. Display a clean image with the tv command, move the cursor to a star of interest (sometimes it helps to use the "z" key to zoom in for a closeup), and press the "a" key.

The computer will print a line of values every time you press the "a" key.
If often helps to plot a radial profile with the "r" key. The graph will give you some idea for the signal-to-noise ratio (S/N) of the measurement.
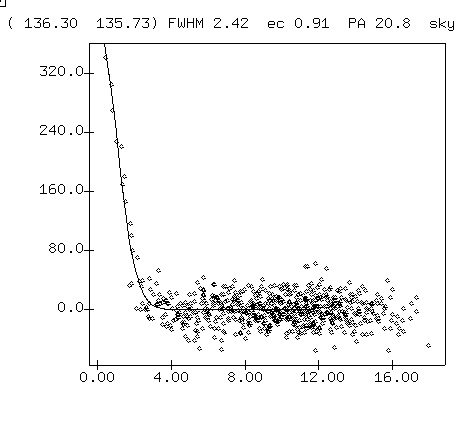
The height of the peak of this radial profile is a measure of the (sky-subtracted) signal from the star. The scatter of the pixel values far from the center is a measure of the noise in the sky background. The ratio of the two is one way to estimate the S/N of the stellar measurement. The percentage of uncertainty in a magnitude measurement can be very roughly estimated by
                                            1
         percent uncertainty  =   100 * ( ------ )
                                           S/N
Exercise:
- What is the S/N ratio, based on the radial profile above?
- Estimate the precision of a single magnitude measurement of the star whose radial profile is shown above.
Please measure by hand the instrumental magnitudes of asteroid Lictoria and four comparison stars in each of your images. Use the stars indicated in this chart (which is a picture of image 1107a.001):

The asteroid moves slowly to the right during the course of the night, so later images will show the asteroid to the right of the circled position above.
You should make a table which looks like this:
# JD        A      B      C      D    asteroid
364.6022  14.33  14.98  16.99  17.22   17.62
364.6023  14.32  14.96  16.95  17.19   17.58
and so forth. The first column should be Julian Date for the image, truncated so that there are 3 digits before the decimal point and 4 digits afterwards.
Copyright © Michael Richmond.
This work is licensed under a Creative Commons License.