
Today, you will
The software you'll use hasn't QUITE been set up properly on the lab computers yet. So, it will be necessary to download and install the code on the machine in front of you.
Here's what you need to do:
         curl -O http://spiff.rit.edu/classes/phys445/code/alpha_xvista.tar

         curl -O http://spiff.rit.edu/classes/phys445/code/start_445.sh

         curl -O http://spiff.rit.edu/classes/phys445/work/data.tar
         tar -xvf alpha_xvista.tar

         tar -xvf data.tar
Phew. That wasn't so bad. The next steps are ones that you will (probably) have to take, today and next week and every other time you use the Gosnell computers.
         cd

         . start_445.sh

         startx
This will initialize several environment variables and then start the X11 Window System on your computer.
Use the xterm window on your display to verify that you have all the files you need for today. At the command prompt, type
         cd

         ls
You should see listings for directories called sep20_2003 and sep24_2003.
When you have reached this point, please pause, and look around. If someone nearby is having problems, please help him or her to reach this point.
Use the Linux cd command to change directories into the sep24_2003 directory. In that directory, you should find a bunch of raw images. Please use the ls command to verify that you have all of the following:
     dark1-001d.fit   dark10-001d.fit   dark20-001d.fit   dark30-001d.fit
     dark1-002d.fit   dark10-002d.fit   dark20-002d.fit   dark30-002d.fit
     dark1-003d.fit   dark10-003d.fit   dark20-003d.fit   dark30-003d.fit

     dark1cold-001d.fit
     dark10cold-001d.fit
     dark20cold-001d.fit
     dark30cold-001d.fit
The first set, with names like dark1-, were taken with the CCD chip at a warm temperature: T = 23 Celsius. The second set, with names like dark1cold-, were taken after the chip was cooled to T = -19 Celsius.
Use the tv command to display images in the "warm" series:
dark1-001d.fit dark10-001d.fit dark20-001d.fit dark30-001d.fit
Display the 1-second dark image. Then type the command
box 1 int
You will be told to define a box by clicking and dragging ...
Make a box in the center of the image, roughly one-quarter of the image width by one-quarter of the image high. If you screw up or don't like the box you get, just repeat the command. When done, you should be told exactly where your box is:

If you now type the command
box 1 show
the box you have just defined should appear on all open image windows.
It may disappear if the window is closed and reopened, or covered
and uncovered.
Boxes are useful to define subsections of images. It's often a good idea to isolate a small section of an image for statistical purposes.
![]()

but the abx command is a bit more verbose.
When you have reached this point, please pause, and look around. If someone nearby is having problems, please help him or her to reach this point.
hist dark1-001d.fit box=1
By running this command on an image, you will create a data file
which has the same name as the image, but with an extension of ".his"
instead of ".fit".
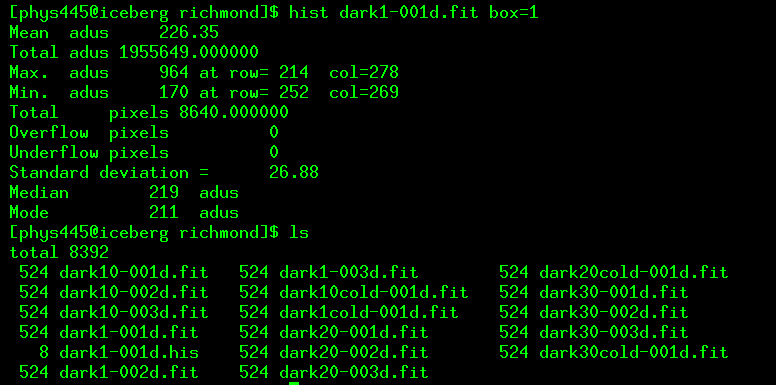
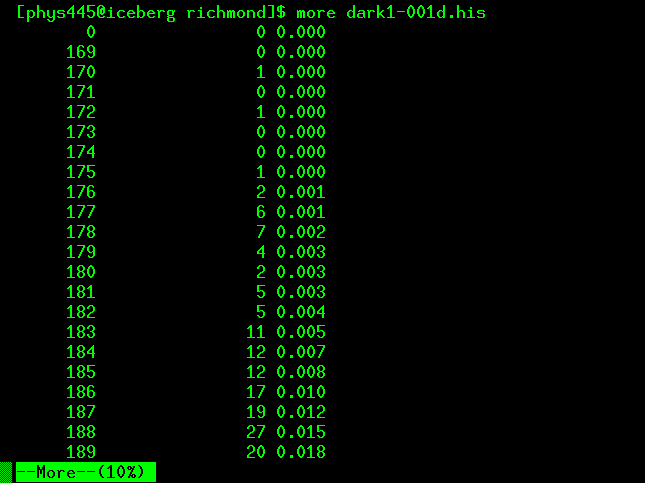
What does this ".his" file contain? A simple 2-column list of data, in which the first column represents a pixel value, and the second column the number of pixels in the image (or sub-image) which have that value. You can look at the values with the Unix command more:
But you can understand this more simply by making a graph.
|
The XVista package contains a quick-n-dirty plotting program called xplot. You can use it like so:
When you run the program, it should pop up a new window, inside which it should draw a graph like this:
You can quit the xplot program by typing "quit" to its command prompt. |
The other way to make this graph is by using a spreadsheet
program such as Excel.
It will probably help to make a copy of the ".his" file
with an added extension ".csv", like this:
Create a new spreadsheet, import the data values from the ".csv" file, and tell the spreadsheet to plot the pixel value on the x-axis and the number of pixels on the y-axis.
|
Now use the hist program to examine the distribution of pixel values for the "cold" images.


