 Copyright © Michael Richmond.
This work is licensed under a Creative Commons License.
Copyright © Michael Richmond.
This work is licensed under a Creative Commons License.
The good news is that CCDs are very sensitive to light, respond linearly to the signal which strikes them, and automatically provide a digitized picture which can be displayed and processed by a computer.
The bad news is that CCDs suffer from several fundamental flaws which will ruin any measurements made from raw images. One must correct for these effects before one can make accurate measurements.
Suppose we take a very short exposure with the shutter closed. Astronomers call this a bias frame What should we see? Nothing! But what do we see?
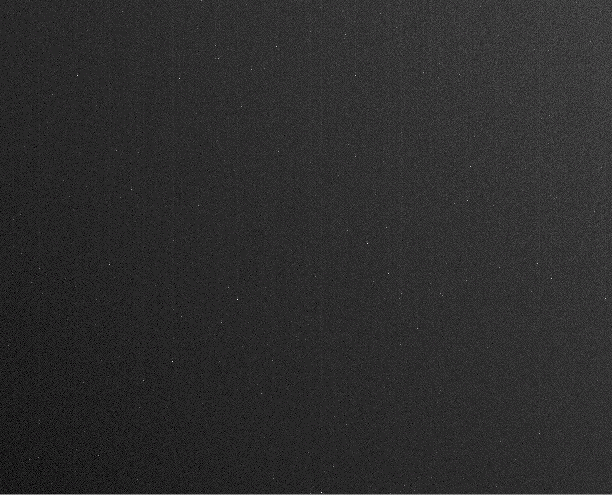
A typical bias image isn't really dark; the pixel values aren't exactly zero. In this example, the average pixel value is about 90 counts. Moreover, there are a few bright spots with higher counts. Hmmmm....
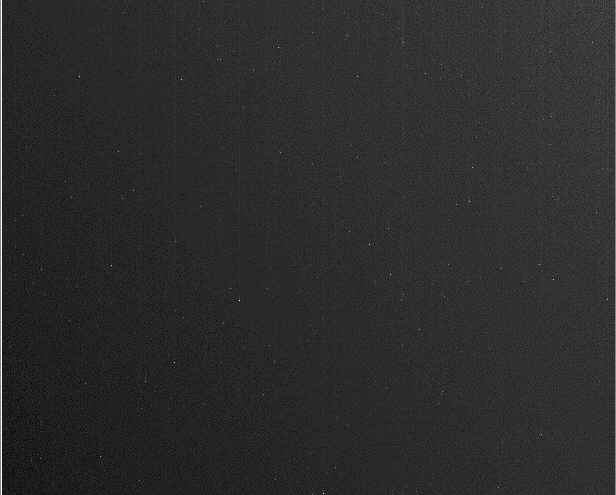
What happens if I take a second picture?

That looks pretty similar ... but it's not exactly the same. Watch as we cycle through three short bias frames:
A few of the pixels in a CCD appear much brighter than the rest in these short exposures. We call these hot pixels. Fortunately, they behave in a reproducible manner.
Now, unless one is studying the Moon or Jupiter, one usually takes pictures with reasonably long exposures: ten seconds, or a minute, or even several minutes. What should happen if we take such a long exposure with the shutter still closed? Well, since no light is hitting the CCD, we should see exactly what we did in the short exposures, right? Let's see ...
Here's the bias image again:
And here's a typical dark image, with exposure length of 30 seconds:
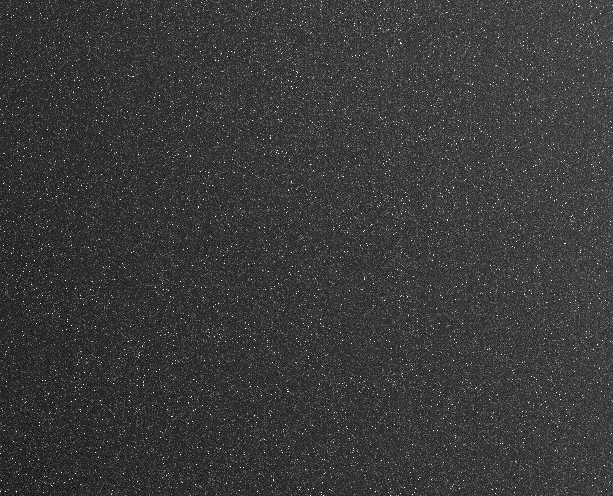
AAAAAAaaaahhhhhh! What happened?
The silicon atoms don't just sit still within their crystal lattice; instead, they wobble and vibrate and jostle their neighbors. Occasionally, one atom will bump into another so hard that it knocks an electron free. That electron then wanders through the chip just like electrons which have been knocked free by a photon. It is shifted across the chip by the electrodes and read out by the amplifier, together with all the photoelectrons. Unfortunately, there is no way for us to tell that it is due to thermal motions instead of photons. Astronomers call this deceptive signal the dark current, because it is caused by electrons which appear in the silicon even in the dark.
The warmer the silicon, the more violent the atoms jostle each other, and the more electrons which are knocked free to confuse us. At room temperature, electrons are produced so quickly that any exposure longer than a few seconds will saturate. That's why ordinarly digital cameras can't be used for astronomical photography. Astronomical CCD cameras have a cooling mechanism to reduce the temperature of the chip and hence the motions of the atoms. For every drop of five degrees Celsius, one decreases the dark current by about a factor of two. Inexpensive air-cooled CCD cameras may reach temperatures of 35 degrees C below ambient, which helps a lot; however, if the air temperature drops during a night, the dark current will change -- which can make removing it a bit complicated. More expensive cameras (like the one here at Gettysburg) use a liquid coolant
Anyway, back to our sample images. It turns out that most of the bright spots in these long dark images look the same in repeated exposures:
So we can make a master dark frame by averaging together a number of dark exposures. If our science frames are 30 seconds long, we must create a dark frame from 30-second exposures with the shutter closed. If our science frames are four minutes long, we must create a dark frame from four-minute exposures with the shutter closed. We can then remove in a statistical sense the electrons knocked free by thermal motions like so:
better image = (raw image) - (master dark image)
That should leave only a signal from the electrons knocked free by photons, which is what we want.
Okay, so we finally are ready to open the shutter! We point the telescope at a blank patch of sky and take a long exposure. We expect to see some hot pixels, but we know how to get rid of them. After we've taken the image, we subtract the master dark. Fine. All that remains should be a uniformly bright picture, right?
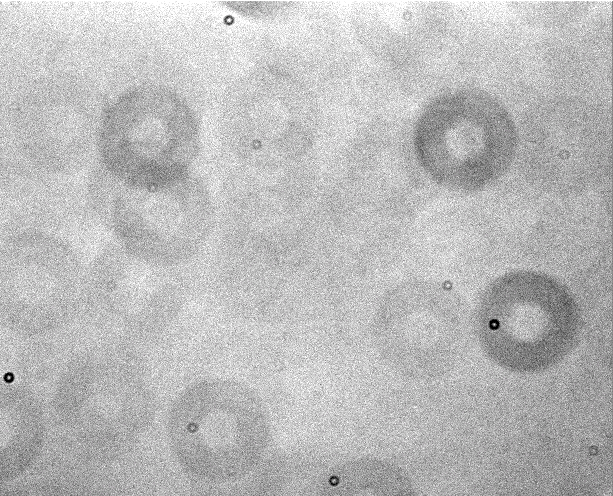
Wrong! Yuck! This looks awful! What's going on?
The problem is that astronomical scenes usually have very low contrast. That means that even very subtle differences in brightness are obvious. What you see here are shadows cast on the chip by tiny specks of dust. Each shadow is a very modest one -- perhaps one or two percent darker than the surrounding area.

But what would happen if one star should fall inside a "dust donut", and an identical star outside the shadow? When we compared them, we might mistakenly believe that the first star was a bit dimmer than the second, even though they are really the same.
Astronomers call the small changes in sensitivity across a CCD chip flat field variations. Some are due to dust, some to inherent properties of the silicon wafer, some due to contamination on the chip's surface. In general, these factors make some areas of the chip more sensitive to light than others. In order to remove the effect, we must generate a master flatfield image by averaging together a number of individual pictures of a uniform, bright area (which might be the twilight sky, a white screen attached to the inside of the dome, or even a T-shirt stretched across the aperture of the telescope). One can then remove the variations by dividing by this master flat:
better image = (dark-subtracted image) / (master flat image)
Now it's time for science!
The result: a clean CCD image which can be used to make accurate measurements of position or brightness.
Copyright © Michael Richmond.
This work is licensed under a Creative Commons License.