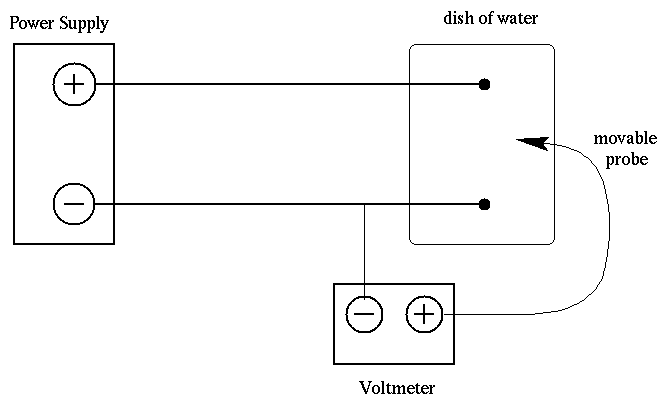
Figure 1. Schematic of electrical potential mapping experiment
In this experiment you will study the properties of electric fields by mapping equipotential lines and constructing the corresponding lines of electric force.
To understand the relationship between electrical fields and voltages.
Although it is relatively easy to calculate the electric field strength and the potential in the vicinity of a few point charges or certain rather simple charge distributions of high symmetry, in the general case the calculations may involve repeated numerical integrations of partial differential equations which are feasible only with high-speed computers.
Usually it is simpler and more direct to map the field experimentally. This may be done by locating a number of points having the same electric potential; when these points are connected together, an equipotential surface is traced out. By repeating this process for other values of the potential, a representation of the entire electric field is obtained. The set of equipotential curves may be thought of as being analogous to the contour lines of equal elevation on a topographical map.
From the set of equipotential curves, another set, the lines of force, may be obtained; the lines of force are everywhere orthogonal (perpendicular) to the equipotential curves. Stated in more physical terms, the electric lines of force are everywhere in the direction for which the change in potential per unit distance is a maximum.
Set the point electrodes symmetrically spaced over the coordinate paper along the long center line (y-axis) with a spacing of approximately 20 cm (one at -10 cm, the other at +10 cm). Record the (x,y) coordinates of the point electrodes so that they can be replaced if they are accidentally moved. Mark the positions of the point electrodes on a piece of Cartesian graph paper.
Adjust the DC power supply to give an output of 12 volts. Use the digital multimeter to make this adjustment. Connect the negative terminal of the multimeter to the negative output of the power supply (positive terminal of the multimeter to the positive output of power supply) (Figure 1).

Figure 1. Schematic of electrical potential mapping experiment
Leaving the negative terminal of the multimeter connected to the negative output of the power supply, place the positive terminal of the voltmeter in the water and locate the locus of points which are at a potential of 2.0 V with respect to the negative point electrode.
A way to do this is to sweep the movable probe of the voltmeter along both major coordinate axes of the graph paper attached to the pyrex dish and locate all points for which the voltmeter reads 2.0 volts. Remember to keep the movable probe vertical, and be careful of parallax as you observe the position of the probe over the coordinate paper. Do not bother to record the coordinate of each point; simply plot the point on your graph paper as you determine it. When finished, draw a smooth dashed curve through the points and label it as the 2V equipotential surface. Does the dashed curve exhibit the expected symmetry? Repeat the procedure for 4V, 6V, 8V, and 10V surfaces, remembering to label each of the resulting dashed curves.
Construct the electric field lines by drawing solid lines from one point electrode to the other, being careful to cross each of the dotted equipotential curves at right angles. Draw at least 5 electric field lines, one being the shortest line between the point electrodes, then 2 each on both sides of this first line. Place arrows in the field lines representing the direction of the electric field.
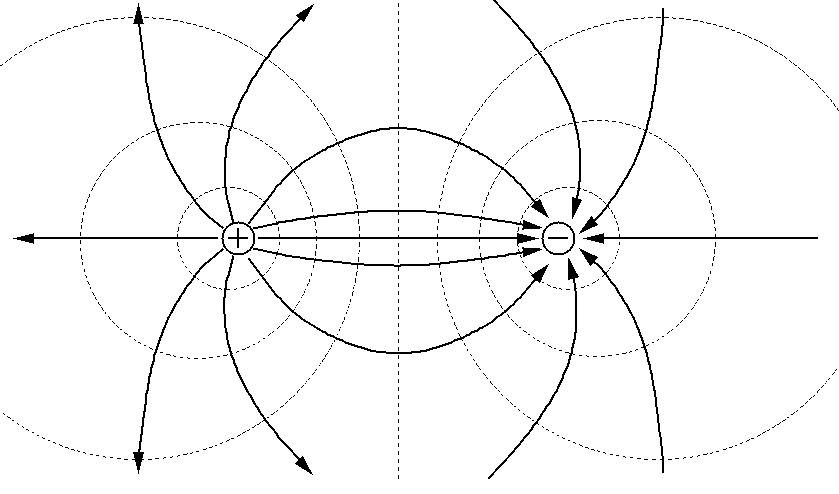
Figure 2 is representative of the equipotential curves and field lines expected for an electric point dipole. How does your result compare?

Figure 2. Electric field lines (solid lines) and
equipotential curves (dashed lines) for an electric dipole.